Step 1:
First, save the picture below that we will use for this lesson.
 Step 2:
Create a new flash document. Press Ctrl+J key on the keyboard (Document Properties) and set the width of your document to 416 pixels and the height to 357 pixels. Select white color as background color. Set your Flash movie's frame rate to 42 and click ok.
Step 3:
Call the current layer picture. Double-click on its default name (Layer 1) to change it. Press Enter once you have typed in the new name!
Step 4:
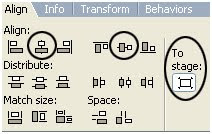
Choose now File > Import > Import to stage (Ctrl+R) and import the picture that you just saved in step 1 into a flash stage. While the picture is still selected, go to the Align Panel (Ctrl+K) and do the following:1. Make sure that the Align/Distribute to Stage button is turned on,2. Click on the Align horizontal center button and3. Click the Align vertical center button.
 Step 5:
While the picture is still selected, hit F8 key (Convert to Symbol) to convert it into a Movie Clip Symbol.
 Step 6:
Click now on frame 65 and hit F6 key.
Step 7:
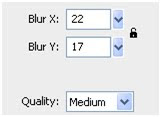
Go back now on the first frame, select the Selection Tool (V) and click once on the picture to select it. After that, go to the Properties Panel (Ctrl+F3) below the stage! Then, select Filters tab from the left side. Click after that on the plus icon and select the Blur filter. Make the adjustments as follows:
 Click after that on the plus icon again and select the Bevel filter. Make the adjustments as follows:
  Click after that again on the plus icon and select the Adjust Color filter. Make the adjustments as follows:
 Step 8:
Select the Free Transform Tool (Q) and enlarge picture like it is shown on the picture below!
 Step 9:
Select the Selection Tool (V) and select frame 1. After that, go to the Properties Panel (Ctrl+F3) below the stage and make the adjustments as follows:
 We're done now!
Test your movie (Ctrl+Enter).
Enjoy!


0 comments:
Post a Comment