 In fact, we don't need that small glowing circle because we can easily create one with Photoshop by going to Filter >Render > Lens Flare, but this image saved us a few steps .
Now let's start to photoshop!
Step 1: Open this picture in Photoshop. If it is too large, you can go to Image > Image Size and set a smaller size (I used 370 pixels in width). When you change it, the height will be automatically changed.
Firstly, press D to reset your colors. Create a new layer, use the Gradient Tool (G) with Foreground to Background option to draw a line from top to bottom of your image. You can hold down Shift key while drawing to create a straight line. We will have

Step 2: Go to Filter > Distort > Wave and use these settings
Step 3: We will blur it a little so go to Filter > Blur > Gaussian Blur and set a radius of 2.1 pixels
Step 4: Now press Ctrl-I to invert our image
 Step 5: Go to Filter > Distort > Polar Coordinates and choose Rectangular to Polar option
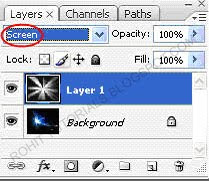
 Step 6: Now change your current layer's blend mode to Screen
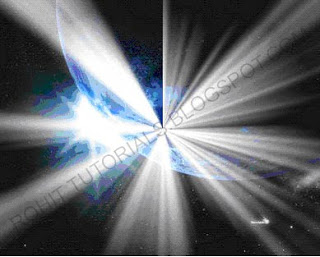
 After this step, we will have
 Step 7: Use the Move Tool (V) to place the center of our light onto the glowing circle
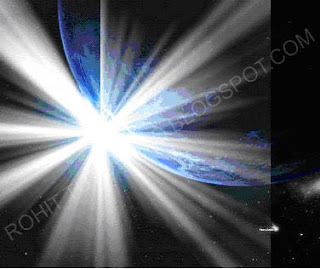
 Step 8: Use the Erase Tool (E) to erase all beams on the Earth. You should also erase the right edge of our beams to make it more real, like this
  Step 9: And ...erm... our image is rather dark, so we should make it brighter. In the Layers tab, select our Background layer and press Ctrl-J to duplicate it, here is my Layers tab after this step
Now press Ctrl-Shift-U to cover its colors into black and white. Once again, change your current layer's blend mode to Screen. By the way, the Screen mode is used for knocking out dark areas, making our image look brighter
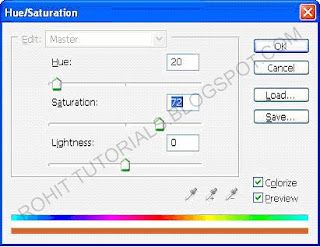
Step 10: Now jump back to Layer 1, which contains our beams, press Ctrl-U to open up the Hue/Saturation dialog box. Make sure to tick on the Colorize checkbox and use these settings
 Well, it's all! Here is our final result


0 comments:
Post a Comment