Step 1: Open an image on which you wish to add the rainbow. In this tutorial, I used the photo below:

Step 2: Create a new layer by clicking on the 'Create a new layer' icon at the bottom of the layers panel. With the new layer selected, select the Gradient tool on the left toolbar. Select the arrow next to the Gradient colors and choose Transparent Rainbow

Step 3: Now click on the Transparent Rainbow itself to open up the Gradient Editor
 Step 4: Try to narrow the width of the sliders, this is how the settings look after all the changes:
 Click OK to accept the changes.
Step 5: From the gradient properties select the radial gradient option because we need to make a "radial" rainbow

Step 6: Drag a line on your document to make your rainbow appear. You can undo (Ctrl-Z) and try different positions until satisfied

Step 7: On the Layers tab change the Opacity of this layer to 42% to make it look transparent

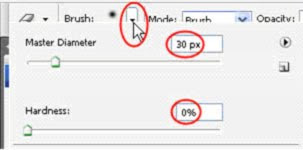
 Step 8: Use the Eraser Tool and select a soft brush (about 30px diameter, 0% hardness) to erase the bottom of the rainbow

 And this is the result, a beautiful rainbow effect for our image:
 Hope you like this tutorial!


0 comments:
Post a Comment