Hi,

My name is Rohit Malhotra, living in New Delhi. I am currently working as a web designer in known designing company "ALPCORD NETWORK".


Here,
you can learn how to create effects in Flash, 3ds max & Photoshop.

It’s like a guide given to you to take right decision to make bright future!!!!
Create a Retro Rainbow Waterfall
Using 3DS Max and Particle Flow

This tutorial will show you how to use Particle Flow to create an outstanding 3D retro rainbow waterfall inside of 3DS Max! We will play with some basic objects and PFlow features to create some imaginative geometric shapes. So, let’s get started!

Final image preview


Step 1
Open up 3DS Max and go to Particle Flow View (6). Create a Standard Flow and replace a “Shape” with “Shape Instance”.
Step 2
Create a box that is 2m long, 0.1m wide and 0.1m high. Add an “Edit Poly” modifier to it and move four vertices on one side of your box a bit forward to create something like on the image below. Step 3
Let’s now change Rotation’s “Orientation Matrix” from “Random 3D” to “Speed Space Follow”. Use 90 for Z axis. After that go to “Birth” event and change the “Emit Stop” to 220 and the “Amount” to 2000. Then go to “Shape Instance” and use your box from the previous step as a “Particle Geometry Object”. Step 4
Make your PFlow wider and duplicate it. Place it like on the image below. You can also use “Find Target” operator and two mesh objects that will act like they are targets. Both methods works similar but the first one is just quicker.Step 5
The last thing is to set up a camera. Try to place it as That’s how it should look like afterwards .Step 6
Now let’s switch to VRay rendering engine and render your scene with resolution set to 1280×800px. I used VRay Sky with standard settings and a default VRayMtl with darker grey. This is what I got after rendering the scene:Step 7
Now move to the Photoshop and create a new document that has 1280×800px. Fill the background layer with black using Paint Bucket Tool (G). Step 8
Cut out your shape from the render using its Alpha channel. You should be familiar with how to cut it out if you’ve read my previous tutorials so I’m not including the full instruction here. Pase it into the main document. Add a Gradient Overlay to it with the following settings.Step 9
Duplicate it and use a “Motion Blur” with angle set to -90 degress and a distance set to something like 60 pixels. Move this layer below the previous one and erase its edges if they create some kind of a glow (we don’t need it).

Step 10
Background is a bit more complicated. First I rendered the scene using the top view. Then I started to draw some huge dots with the brush and the color set to green and blue on a separate layers. I set the first layer to “Soft Light” and the second to “Normal” but with opacity decreased to 30%.

Step 11
Finally, I decided not to use the shape from the previous step but I did something similar instead. Press CTRL/CMD and click on the layer with the rendered shapre visible from the top. Once it’s selected click on the layers from the previous step and use this selection as their mask. That should give you a nice effect like on the image below.


Step 12
After that repeat the two previous steps to create other parts of the background. You may want to use some additional textures to make the background more interesting. Once you turn on all the layers you’ve created you should see something similar to the final image. Most likely it will require some Brightness/Contrast tweaks and I’ve also added some little shiny particles in the background. I’ve also created a new layer with clouds (Filter -> Render -> Clouds…) and set it to overlay with decreased opacity.

Conclusion
That’s all. I hope you enjoyed it! If so, you may check my other tutorials or visit this site often to see even more in the future! Click on the image below to see it in the full size.


Calendar Girl Mask Photo Presentation

Step 1:
First, save the photo below that we will use for this lesson as background.
Step 2:
Create a new flash document. Press Ctrl+J key on the keyboard (Document Properties) and set the width of your document to 420 pixels and the height to 315 pixels. Select any color as background color. Set your Flash movie's frame rate to 33 and click ok.

Step 3:
Call the current layer photo. Double-click on its default name (Layer 1) to change it. Press Enter once you have typed in the new name!

Step 4:
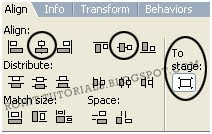
Choose now File > Import > Import to stage (Ctrl+R) and import a photo that you just saved in step 1 into a flash stage. While the photo is still selected, go to the Align Panel (Ctrl+K) and do the following:
1. Make sure that the Align/Distribute to Stage button is turned on,
2. Click on the Align horizontal center button and
3. Click the Align vertical center button.

Step 5:
While the photo is still selected, hit F8 key (Convert to Symbol) to convert it into a Movie Clip Symbol.

Step 6:
Select frame 65 and hit F6 key.

Step 7:
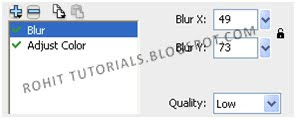
Go back on the first frame, select the Selection Tool (V) and click once on the photo to select it.Then, go to the Properties Panel (Ctrl+F3) below the stage. Select Filters tab from the left side. Click after that on the plus icon and select the Blur filter. Make the adjustments as follows:

Step 8:
Right-click anywhere on the gray area between frame 1 and 65 on the timeline and choose Create Motion Tween from the menu that appears.

Step 9:
Create a new layer above the layer photo and name it mask.

Step 10:
Select mask layer and draw a shape and place it on the position like it is shown on the picture below!Step 11:
Select now frame 30 and hit F6 key. While you're still on frame 30, make the shape like it is shown on the picture below!


Step 12:
Select frame 65 and hit F6 key. While you're still on frame 65, make a shape like it is shown on the picture below!

Step 13:
Right-click anywhere on the gray area between frame 1 and 30 and frame 30 and 65 on the timeline and choose Create Shape Tween from the menu that appears.

Step 14:
Select now mask layer and convert it to a mask by right-clicking on the mask layer and selecting Mask. See the picture below.

We're done!
Please Enjoy!

Sparkling Glass Effect

Step:1 Import the Background Image
Open a new file. Go to File >New. Select Flash Document. Click OK. Go to Modify > Document to give a file size of 180px by 400px. This is the same size as the Bitmap picture we have. Select the Bitmap pictures which you want to put as background and bring it to the Flash Library by clicking on Select File > Import to Library from the Menu Bar. Go to Window > Library, You can see the picture in the Library panel. Drag the picture named Bitmap to the Stage. Select the picture by clicking on it. This will be your first layer, name it background.Now you have to create 7 movie clips. You have to have basic knowledge in FLASH MX to do this. As you know movie clips work independently, and you can use them whenever required.

Step:2 Create a Rotating Star Movie Clip
Create a new layer. Name it sparkle. Go to Insert > New Symbol. The 'Create New symbol' screen will appear. Name this movie clip ' star_mc'. Click OK. You will be directed inside the movie clip. Now select the PolyStar Tool. To select the Polystar tool , first go to the Rectangle tool and select it in the drop down menu as seen below.


Go to the Properties window. Go to Options. A screen called Tool Settings will appear.

Enter these values and click OK
Style: StarNumber of sides 4
Star Point Size: 0.10

Now draw the Star (without a stroke color). Make the star into a movie clip entitled star_mc. Now double click on it. On frame 1 you will see your star. Go to Properties>Tween. Select Motion from the drop down Menu. Name it as star_in_mc. Go to frame 10. Press F6 to insert a new keyframe. Select the star and go to Modify > Transform > Rotate CW. Repeat Modify>Transform>Rotate CW thrice. Your rotating Star movie Clip is ready. You will see it in the Library Window also. This movie clip star_mc will not be there in the sparkle layer but stored in the Library, we will use it later.

Step:3 Create a movie clip with a small opaque circle that increases in size and becomes almost transparent
Draw a circle with Oval Tool, choose the fill color as white and make it 2px by 2px. Select it. Go to Modify>Convert to Symbol from the Menu Bar. A dialog Box named Create New Symbol will appear. Give the name as shade_mc. Select Movie Clip. Click on OK. double click on it. You will be inside the Movie clip and in your first frame you will see the dot. Select it. Go to Modify>Convert to Symbol from the Menu Bar. A dialog Box named Create New Symbol will appear. Give the name as shade_in_mc. Go to Frame5. Press F6 to insert keyframe. Go to Properties>Tween. Select Motion from the drop down Menu. Go to Frame 10. Press F6 to insert keyframe. Now go to Frame 5. Select your movie clip. Increase the size to 14.3px by 14.3px. Go to Frame 1. Select the dot. Go to Properties. Select Color as Alpha in the drop down menu and give 100%. Go to Frame 5. Select the dot. Go to Properties. Select Color as Alpha in the drop down menu and give 10%. Go to Frame 10. Select the dot. Go to Properties. Select Color as Alpha in the drop down menu and give 5%. This movie clip shade_mc will not be there in the sparkle layer but stored in the Library, we will use it later.

Step:4 Create another movie clip with a star which becomes smaller at a slower rate than our 1st star movie clip
Go to Main Scene. Go to Insert > New Symbol. The Create New symbol screen will appear. We will name your first movie clip as star_mc. You will be directed inside the movie clip. Now go to PolyStar Tool. To go to polystar tool , first go to rectangle tool and select it in the drop down menu. Go to Properties window. Go to Options. A screen called Tool Settings will appear. Select Style, in the drop down menu as Star. Select Number of sides 4. Select Star Point Size as 0.10. Click on OK. Give color as white.Now draw the Star. Give the size to 23px by 23px. Select the edge and delete them. Choose the star and make it a Movie Clip. Name it star_s_mc. Now double click on it. On frame 1 you will see your star. Go to frame 10. Press F6 to insert a new keyframe. Go to Properties>Tween. Select Motion from the drop down Menu. Go to Frame20. Press F6 to insert keyframe. Go to Properties>Tween. Select Motion from the drop down Menu. Now go to frame 10. Select your movie clip. Go to Properties. Give the size to 9px by 9px. This movie clip star_s_mc will not be there in the sparkle layer but stored in the Library, we will use it later.

Step:5 Create the sparkle movie clip by combining the movie clips created above and place it where required
You have already created 6 movie clips. Now we will create the last main movie clip. Go to Insert>New Symbol. The Create New symbol screen will appear. We will name your main movie clip as sparkle_mc. You will be directed inside the movie clip. Drag in here these 3 movie clips : star_mc, shade_mc , star_s_mc because when they are combined they will give the sparkle effect, and adjust them properly in the middle. Now go to your main scene. Go to layer sparkle. Drag the Main movie Clip sparkle_mc wherever you want the Sparkling Glass Effect to be seen. You can use it on a diamond ring, a golden jewelry or on sparkling text also.

Step:6
Save your file as sparkle.fla. Press on Ctrl+Enter to see the Sparkling Glass Effect. This will create automatically sparkle.swf file.

Smoky Blow Text Effect

Step 1:
Open a new flash document. Rename layer 1 to “Zoom in” and insert a new layer called “Zoom out” and drag it below the “Zoom in” layer. You should now have two layers.Select the Zoom in layer and then select the text tool (t) and type your message on the stage. I used impact font type with 70pt font size, but you can use whatever font type you wish. Make sure you font size is fairly large.
Step 2:
Convert your message into a symbol by pressing F8. Give your symbol an appropriate name, check movie clip and click ok.Select the 35th frame and hit F5 to insert frames.

Step 3:
Select the 10th frame and insert a key frame by selecting F6. Now using the selection tool (V) select your message and then select the free transform tool (Q). Hold down the shift key and drag one of the corner handles until your message is about half the size of your original message.Now right click anywhere in between the 1st and 10th frame and select Create Motion Tween.

Step 4:
Select the zoom out layer and insert a key frame at the 11th frame by pressing F6. Lock the zoom in layer by selecting the little padlock on the timeline.Now from the library panel drag another instance of your message onto the stage. Make sure this instance is on top of your message from the zoom in layer, like below:

Step 5:
Select the 25th frame and hit F6 to insert a key frame. Using the selection tool select the message and change the colour properties to Alpha at 0%.Now select the 11th frame and then select your message and change the colour properties to Alpha at 62%. Now select the free transform tool (Q). Hold down the shift key and drag one of the corner handles until your message is the same size as your original message. It doesn’t matter if the two message down match.Right click anywhere in between the 11st and 25th frame and select Create Motion Tween. Your timeline should look like below:

Step 6:
Test your movie clip Ctrl + enter.

Zoomed Picture Presentation

Step 1:
First, save the picture below that we will use for this lesson.
Step 2:
Create a new flash document. Press Ctrl+J key on the keyboard (Document Properties) and set the width of your document to 416 pixels and the height to 357 pixels. Select white color as background color. Set your Flash movie's frame rate to 42 and click ok.

Step 3:
Call the current layer picture. Double-click on its default name (Layer 1) to change it. Press Enter once you have typed in the new name!

Step 4:
Choose now File > Import > Import to stage (Ctrl+R) and import the picture that you just saved in step 1 into a flash stage. While the picture is still selected, go to the Align Panel (Ctrl+K) and do the following:1. Make sure that the Align/Distribute to Stage button is turned on,2. Click on the Align horizontal center button and3. Click the Align vertical center button.Step 5:
While the picture is still selected, hit F8 key (Convert to Symbol) to convert it into a Movie Clip Symbol.Step 6:
Click now on frame 65 and hit F6 key.

Step 7:
Go back now on the first frame, select the Selection Tool (V) and click once on the picture to select it. After that, go to the Properties Panel (Ctrl+F3) below the stage! Then, select Filters tab from the left side. Click after that on the plus icon and select the Blur filter. Make the adjustments as follows:
Click after that on the plus icon again and select the Bevel filter. Make the adjustments as follows:
Click after that again on the plus icon and select the Adjust Color filter. Make the adjustments as follows:

Step 8:
Select the Free Transform Tool (Q) and enlarge picture like it is shown on the picture below!

Step 9:
Select the Selection Tool (V) and select frame 1. After that, go to the Properties Panel (Ctrl+F3) below the stage and make the adjustments as follows:

We're done now!
Test your movie (Ctrl+Enter).
Enjoy!
Mask Zooming Photo Animation


Step 1:
First, save the image below that we will use for this lesson as background.
Step 2:
Create a new flash document. Press Ctrl+J key on the keyboard (Document Properties) and set the width of your document to 400 pixels and the height to 300 pixels. Select any color as background color. Set your Flash movie's frame rate to 36 and click ok.

Step 3:
Call the current layer photo. Double-click on its default name (Layer 1) to change it. Press Enter once you have typed in the new name!

Step 4:
Choose now File > Import > Import to stage (Ctrl+R) and import a photo that you just saved in step 1 into a flash stage. While the photo is still selected, go to the Align Panel (Ctrl+K) and do the following:1. Make sure that the Align/Distribute to Stage button is turned on,2. Click on the Align horizontal center button and3. Click the Align vertical center button.

Step 5:
While the photo is still selected, hit F8 key (Convert to Symbol) to convert it into a Movie Clip Symbol.Step 6:
Click on frame 100 and hit F6 key.

Step 7:
Go back on the first frame, select the Selection Tool (V) and click once on the photo to select it. Then, go to the Properties Panel (Ctrl+F3) below the stage. Select Filters tab from the left side. Click after that on the plus icon and select the Blur filter. Make the adjustments as follows:
Click again on plus icon and select Adjust Color. Make the adjustments as follows:

Step 8:
Right-click anywhere on the gray area between frame 1 and 100 on the timeline and choose Create Motion Tween from the menu that appears.

Step 9:
Create a new layer above the layer photo and name it mask.

Step 10:
Select the mask layer, take the Oval Tool (O) and draw a circle shape about 1120x1120 px and place it on the center. See the picture below!


Step 11:
Click now on frame 100 and hit F6 key. After that reduce the dimension of the circle to 560x560 px.Step 12:
Right-click anywhere on the gray area between frame 1 and 100 on the timeline and choose Create Shape Tween from the menu that appears.

Step 13:
Select now mask layer and convert it to a mask by right-clicking on the mask layer and selecting Mask. See the picture below.

We're done!
Test your animation and enjoy!

Beauty Face Photo Presentation


Step 1:
First, save the photo below that we will use for this lesson.


Step 2:
Create a new flash document. Press Ctrl+J key on the keyboard (Document Properties) and set the width of your document to 420 pixels and the height to 315 pixels. Select any color as background color. Set your Flash movie's frame rate to 44 and click ok.


Step 3:
Call the current layer photo1. Double-click on its default name (Layer 1) to change it. Press Enter once you have typed in the new name!

Step 4:
Choose now File > Import > Import to stage (Ctrl+R) and import a photo that you just saved in step 1 into a flash stage. While the photo is still selected, go to the Align Panel (Ctrl+K) and do the following:1. Make sure that the Align/Distribute to Stage button is turned on,2. Click on the Align horizontal center button and3. Click the Align vertical center button.
Step 5:
While the photo is still selected, hit F8 key (Convert to Symbol) to convert it into a Movie Clip Symbol.

Step 6:
Click on frame 50 and hit F5 key.

Step 7:
Go back on the first frame, select the Selection Tool (V), click once on the photo to select it and go to the Properties Panel (Ctrl+F3) below the stage. Select Filters tab from the left side. Click after that on the plus icon and select the Blur filter. Make the adjustments as follows:

Step 8:
Create a new layer above the layer photo1 and name it photo2. Go back on the first frame of layer photo1 and hit Ctrl+C key (Copy). After that, select the first frame of layer photo2 and hit Ctrl+Shift+V key (Paste In Place).

Step 9:
Click now on frame 50 of layer photo2 and hit F6 key. While you're still on frame 50, select the Selection Tool (V) and click once on the photo to select it. Then, go again to the Properties Panel (Ctrl+F3) below the stage. Select Filters tab from the left side. Click after that on the plus icon and select the Blur filter. Make the adjustments as follows:

Step 10:
Select the first frame of layer photo2 and repeat the previouse step. For this time, make the adjustments as follows:

Step 11:
Right-click anywhere on the gray area between frame 1 and 50 on the timeline and choose Create Motion Tween from the menu that appears.

Step 12:
Create a new layer above the layer photo2 and name it mask.

Step 13:
Select the first frame of layer mask and draw a circle shape about 12x12px and place it on the center of background.

Step 14:
Click now on frame 60 and hit F6 key. Step 15While you're still on frame 60, select the Free Transform Tool (Q) and enlarge a circle to cover the whole photo. See the picture below!
Step 16:
Select now mask layer and convert it to a mask by right-clicking on the mask layer and selecting Mask.We're done!Test your animation and enjoy!

Shout Me


Browse